Monday, November 9, 2009

{I LOVE PUMPKINS}

I think I have an obsession with pumpkins in all shapes and sizes. Just picking out our kiddos pumpkins to carve was a fun thing for me. I love all there funky shapes and sizes!! Here is a super fun and easy craft. I don't have all of the step by step but I can give you directions on what to use and how to do it!!!


{Cute Wooden Pumpkins}

Items you will need:
3- wooden blocks (3 different sizes) my tallest in about 6- 7 inches and
my smallest is about 3- 4 inches!!
Orange Paint
1 Large wooden dowel/ or 3 small wooden dowels (Stem's on the pumpkins)
Strand of leaves (Dollar store has them)
Raffia
Sand paper
Wood Glue or Hot Glue


Directions:


Step 1: Take your 3 wooden blocks and sand them down good
Step 2: Paint all three of them orange- Let them dry really well
Step 3: Paint your 3 Dowels Green- also let them dry well
Step 4: Sand your edges a little, making them look old and weathered :)
Step 5: Glue your wooden dowels on the tops of all 3 pumpkins
Step 6: Hot glue or glue some leaves around the top of the block/pumpkin
Step 7: Tie your raffia around the stems and let hang down the side of your pumpkins!


And there you have it:

Saturday, November 7, 2009

~Count Your Blessings~


Here is another super cute Thanksgiving craft, cute door decor!!
~Count Your Blessings~
Items you will need:
3- 2x4x4 blocks
Sand paper
paint
coordinating scrapbooking paper
embellishments
rub-on or cricut cut letters
paint brushes
ribbon
staple gun
raffia
Items you will need
Step 1: Sand and paint your blocks with your colors you picked!

Step 2: After your blocks dry measure your fall type paper and cut squares
out. I left a small border around the edges.

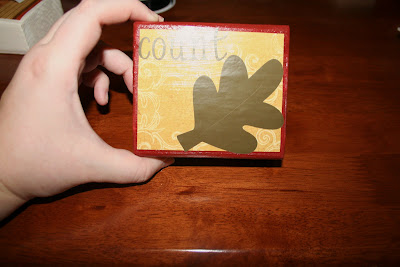
Step 3: *This isn't the right block* But showing you next to mod podge your
paper to the block. (Remember to let the it dry really well so they don't stick.)
Step 4: Rub on or transfer on your letters and your leaves or other decor.
Step 5: Block #1 with "count" and a leaf.
Block #2 with "your" and leaf.

Block #3 with "blessings" and also the leaf.
Step 6: After everything has dried really well take your ribbon and start stapling to the back of the blocks. Leaving about 1 inches between each block.
Step 7: on the top block, the "count" block...fold a loop and staple it again.


Step 8: In the loop tie your raffia into a bow to hang it from.

Step 9: Hang it from your door and ENJOY!! Super cute! :)


Friday, November 6, 2009

~Giving Thanks~

Thanksgiving is coming up soon...and I was in desperate need of some Decor for Thanksgiving!! So I threw together this super cute, easy blocks!! They are so fun!! Here is a step by step tutorial!!

~GIVE THANKS BLOCKS~

Items you will need:
2- 4X4x4 blocks of wood
paint
paint brush
Mod podge
Fall scrapbooking paper
Sand paper
Scissors
Rub on or Cricket lettering


Here are a few of the supplies.... I forgot a few in the picture! sorry!! :)

Step 1: Sand down your 2- 4x4x4 blocks
Step 2: Paint your blocks with color you chose out
Step 3: While your blocks are drying...you can measure and cut your
paper for the your blocks.

Step 4: After your blocks dry...mod podge your paper to all sides of the block


Step 5: Let your blocks dry for at least 24 hrs before stacking them on top
of each other..otherwise they will stick! :)

Step 6: Rub on or transfer your letters and leaves and such on. When rubbing on or transferring your lettering do the "give" on the "left" side of one block and shown below is the "thanks" on the "right side of the other block". That way when you stack them you see both "give" and "thanks".

Step 7: Rub on or transfer on the "thanks" on the right side of the other block..as talked about above! :)

Step 8: Embellish if you would like with buttons or ribbon or anything you want to! :)

Step 9: Let everything dry well and stack them as shown! Set them up somewhere and it can remind you to "give thanks" for the many things we have and the many blessings we all have!!

~Enjoy!!~

Monday, October 26, 2009

~Organize~

If you like to craft then you usually have ALOT of stuff. Odds and ends...a little of this and a little of that. Well my craft "corner" and "area" was a MESS!! So I decided to get it all organized! This is how I did it!!
ORGANIZE!!!

You will need:
Stuff that needs to be organized
Crates (Walmart has them for $1!!)
Cricut
or Rub-on Letters
Step 1: Get all your stuff out and seperate it into individual piles
Ex. Paint, Tools, Ribbon.....etc..
Step 2: Put each individual pile of things into a crate.

Step 3: With your cricut or rub-on letters, label each crate.

Step 4: There you have all of your things organized into individual crates nicely stacked to where you can see and get to each one of them!

AAHHHHH I love organization...now if I can get my Laundry and the rest of my house to be this easy!! :)

Sunday, October 25, 2009

~~Cute Baby Leggins~~

Baby Leggins or Lil Girl Leggins for me are so so cute!! I love them! They are super easy to make as well. So here is a step by step tutorial of how to make them!!

Baby Leggins
Items you will need:
1 pr. of tube socks (Target is where I got mine)
Scissors
Sewing Machine
Matching thread

Step 1- Take socks out of the packaging and lay them out flat.
Step 2: Cut the heel and the toe of the sock out... make sure to cut straight across.

Step 3- You will only need the long part of the sock the leg part and the middle piece (one between the toe and heel)
Step 4- Take the small piece (One between heel and toe) and fold it in half with right side out.


Step 5- Put over the "leg" of the sock match up the "cut" edges.


Step 6- With your sewing machine sew about 1/2 inch-1 inch in, make sure you don't sew the hole of the sock shut!!


Step 7-Trim up all of the strings

Step 8-Flip the sock back down inside of itself.


Step 9- Like this!

Step 10- Make a bunch more and find the cutest little girl or baby to put them on!!

Super fun and super easy!!! Love them! :)

Friday, October 16, 2009

~Candy Corn Flower Vase~

This project is easy peasy but is so cute!! Perfect for this time of the year!!
~CANDY CORN FLOWER VASE~
You will need:
Medium/Large Vase
1-2 Bags of Candy Corns (depending on size)
Assortment of "Fallish" Flowers
Step 1: Clean your vase out and fill it with candy corns to the neck of the vase

Step 2: Get your bunch of fallish flowers and stick them down into the candy corns and arrange it into a nice bouqet!

and..... There you have it!!! Your Halloween/Fall vase! Sits so perfectly on your table!!


~Mod Podge Recipe File~

I'm so excited to start all of this...now this is no "professional" crafters blog of any sorts. The main reason I started this was to keep note of some of the crafts I do...and to share the ideas with you! So for the first craft post!!
MOD PODGE RECIPE FILE!
First off...I LOVE Mod Podge! I like either Gloss or Matte but usually use the Matte. But in this project I used Gloss. So anyway for this project you will need:
Small-Medium Wood Box with Latch- (found at Micheals or any craft store)
Red Paint/ or Color that coincides with your paper
1 sheet of scrapbooking paper
Paint Brush
Embellishments (Ribbon/buttons/flowers)
Mod Podge


Step 1: Paint the entire wooden box with color of choice/ mine was red. You may chose to remove the latch. I did on mine...I'm not a fan of Gold!
Let it dry good for 20-30 mins


Step 2: Measure Scrapbooking paper on all sides of the box/cut/and Mod Podge it to the Box.


Step 3: Here it is with all the paper mod podged...I left a small red "edge" around it to bring out the red in the paper. Let this dry really well.

Step 4: Embellish your box with ribbon, flowers, and buttons. I did 3 strips of coinciding ribbon on top and then did coinciding flowers on top of the ribbon.


I also added Ribbon and buttons to the Front of the box. I cut "Recipe" with my cricut and put it on the front. You can use any type of letters you want and mod podge them on or hot glue whichever is easiest!


Let everything dry over night and you will have your super cute Recipe File ready for you in the morning!!! Love it!


If you have any other questions feel free to comment and ask!! Also if you are interested in purchasing them. You can contact me and I will give you price information!! They are super fun to make!! ENJOY :)