Sunday, November 15, 2009

{Thanksgiving}

Here is another cute and easy craft for Thanksgiving...I seem to have hardly any decoration for this lovely Holiday so I have been creating a few here and there!!
{Thanksgiving Board}

Item's you will need:
1- 1x6x16 piece of wood
Paint
Paint brushes
Ribbon
Cricut Letters or Rub-On's
Step 1: Paint your 1x6x16 board with your paint of choice.
Step 2: After your paint drys really well...Sand down your corners if you chose to!

Step 3: Take your ribbon and tie it around one end of your board like so:

Step 4: Take your Cricut lettering or Rub-on and center it and rub it on your board


Step 5: Add any other little embellishments that you chose!


Then you are all done!!! SOO cute!

Monday, November 9, 2009

{I LOVE PUMPKINS}

I think I have an obsession with pumpkins in all shapes and sizes. Just picking out our kiddos pumpkins to carve was a fun thing for me. I love all there funky shapes and sizes!! Here is a super fun and easy craft. I don't have all of the step by step but I can give you directions on what to use and how to do it!!!


{Cute Wooden Pumpkins}

Items you will need:
3- wooden blocks (3 different sizes) my tallest in about 6- 7 inches and
my smallest is about 3- 4 inches!!
Orange Paint
1 Large wooden dowel/ or 3 small wooden dowels (Stem's on the pumpkins)
Strand of leaves (Dollar store has them)
Raffia
Sand paper
Wood Glue or Hot Glue


Directions:


Step 1: Take your 3 wooden blocks and sand them down good
Step 2: Paint all three of them orange- Let them dry really well
Step 3: Paint your 3 Dowels Green- also let them dry well
Step 4: Sand your edges a little, making them look old and weathered :)
Step 5: Glue your wooden dowels on the tops of all 3 pumpkins
Step 6: Hot glue or glue some leaves around the top of the block/pumpkin
Step 7: Tie your raffia around the stems and let hang down the side of your pumpkins!


And there you have it:

Saturday, November 7, 2009

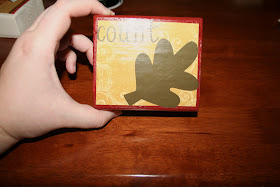
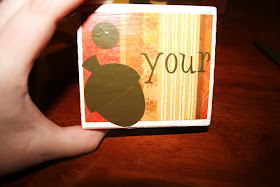
~Count Your Blessings~


Here is another super cute Thanksgiving craft, cute door decor!!
~Count Your Blessings~
Items you will need:
3- 2x4x4 blocks
Sand paper
paint
coordinating scrapbooking paper
embellishments
rub-on or cricut cut letters
paint brushes
ribbon
staple gun
raffia
Items you will need
Step 1: Sand and paint your blocks with your colors you picked!

Step 2: After your blocks dry measure your fall type paper and cut squares
out. I left a small border around the edges.

Step 3: *This isn't the right block* But showing you next to mod podge your
paper to the block. (Remember to let the it dry really well so they don't stick.)
Step 4: Rub on or transfer on your letters and your leaves or other decor.
Step 5: Block #1 with "count" and a leaf.
Block #2 with "your" and leaf.

Block #3 with "blessings" and also the leaf.
Step 6: After everything has dried really well take your ribbon and start stapling to the back of the blocks. Leaving about 1 inches between each block.
Step 7: on the top block, the "count" block...fold a loop and staple it again.


Step 8: In the loop tie your raffia into a bow to hang it from.

Step 9: Hang it from your door and ENJOY!! Super cute! :)


Friday, November 6, 2009

~Giving Thanks~

Thanksgiving is coming up soon...and I was in desperate need of some Decor for Thanksgiving!! So I threw together this super cute, easy blocks!! They are so fun!! Here is a step by step tutorial!!

~GIVE THANKS BLOCKS~

Items you will need:
2- 4X4x4 blocks of wood
paint
paint brush
Mod podge
Fall scrapbooking paper
Sand paper
Scissors
Rub on or Cricket lettering


Here are a few of the supplies.... I forgot a few in the picture! sorry!! :)

Step 1: Sand down your 2- 4x4x4 blocks
Step 2: Paint your blocks with color you chose out
Step 3: While your blocks are drying...you can measure and cut your
paper for the your blocks.

Step 4: After your blocks dry...mod podge your paper to all sides of the block


Step 5: Let your blocks dry for at least 24 hrs before stacking them on top
of each other..otherwise they will stick! :)

Step 6: Rub on or transfer your letters and leaves and such on. When rubbing on or transferring your lettering do the "give" on the "left" side of one block and shown below is the "thanks" on the "right side of the other block". That way when you stack them you see both "give" and "thanks".

Step 7: Rub on or transfer on the "thanks" on the right side of the other block..as talked about above! :)

Step 8: Embellish if you would like with buttons or ribbon or anything you want to! :)

Step 9: Let everything dry well and stack them as shown! Set them up somewhere and it can remind you to "give thanks" for the many things we have and the many blessings we all have!!

~Enjoy!!~